

In this DIY kayak cart guide, we’ll walk you step-by-step through the process of creating your very own DIY canoe cart.
Kayak fishing is becoming more and more popular [1]. However, it’s not easy to get your kayak down to the water, especially if you’re on your own. You don’t want to damage your kayak by dragging it along the ground. However, buying a kayak cart can set you back a lot of money. That’s why making your own DIY kayak cart is such a good idea.
By following our guide, this kayak cart DIY project should only set you back about $15-20. That’s a bargain compared to shop-bought carts! Plus, it’s not tricky to do at all.
Watch the video, and then read through the simple steps below. We’ll explain every single step to make it super easy for you. By joining the DIY revolution [2] and your own kayak cart, you’ll protect your kayak from damage and save money at the same time! Let’s get stuck in!
What You’ll Need to Make a DIY Kayak Cart
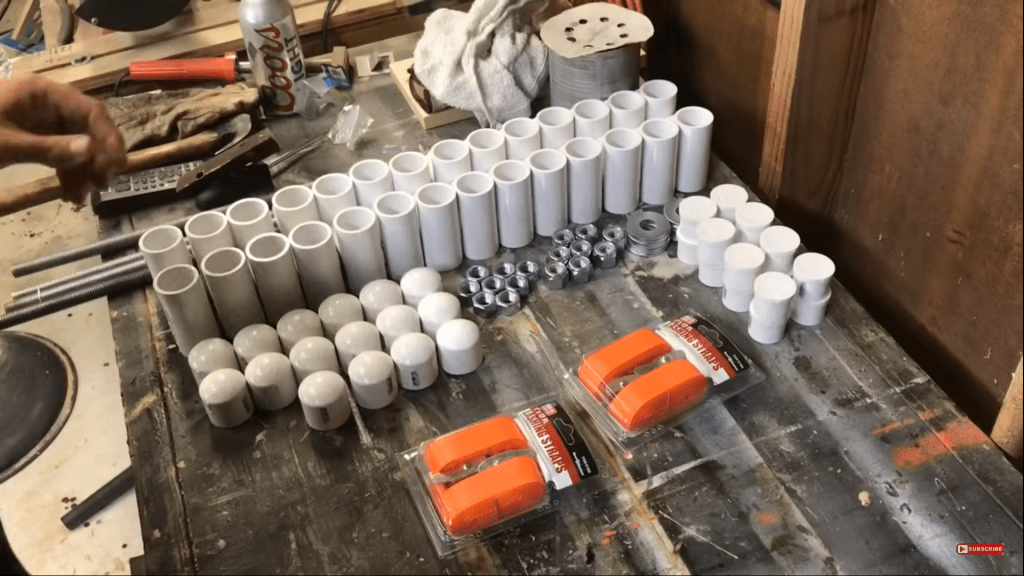
Here’s everything you’ll need for your kayak cart DIY project:
- 10 feet of 1-inch PVC pipe
- 2 wheels – the holes should measure 5/8 inch in diameter
- Lashing straps and buckle to attach your kayak to the cart
- Threaded rod measuring 5/8 inch in thickness. You’ll need 2.5-3 feet of rod.
- 7 generic T junctions
- 4 or 5 end caps
- 4 or 5 plugs to go over the end caps
- Nuts measuring 5/8 of an inch
- Oversized washers measuring 5/8 of an inch
- PVC glue and primer
- 1 pool noodle
In the video, you’ll see a lot materials altogether. Don’t worry – you won’t need that much! There’s enough in the video to make 4 kayak carts, so you won’t need to buy as much for your project. Just grab everything listed above, and you’ll be ready to get started.
DIY Kayak Cart Step-by-Step Process
Step 1: Drill holes in plugs

For this project, we’ll place the plugs over the Ts, and then the rod will go through them both. So you need to drill holes through the plugs. The holes you drill should measure 5/8 of an inch to fit the threaded rod neatly. Go ahead and drill your holes now, so you’re ready to move onto the next bit.
Step 2: Apply glue to plugs
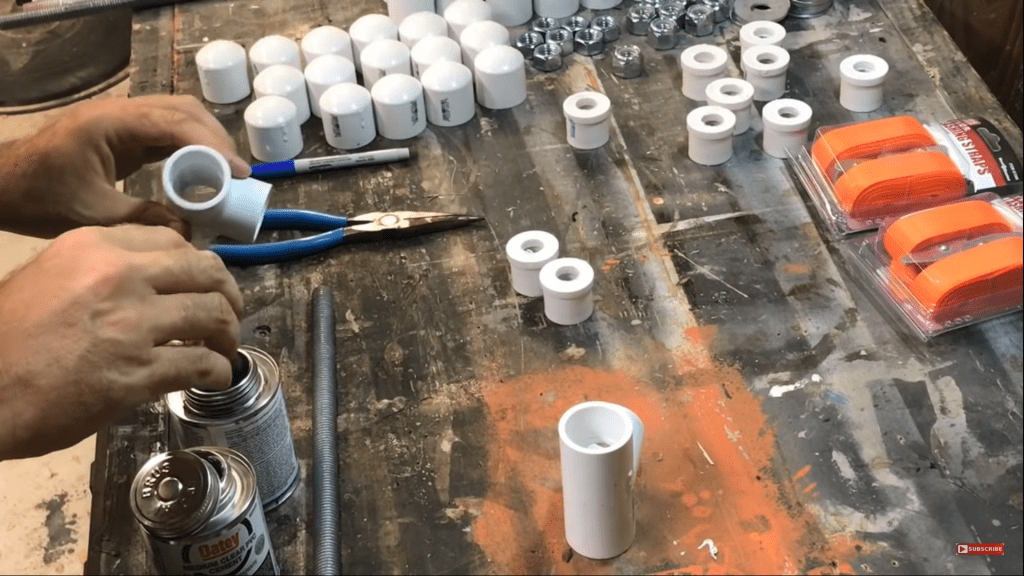
Apply primer then the PVC glue to the Ts and plugs. You only need a plug on the outer side of the plug, next to the wheel. Place the plug inside the outer end of the Ts, one at a time.
Step 3: Tap plugs into place

Use a hammer to tap your plugs firmly into place. This method should hold your plugs and Ts together sturdily.
Step 4: Wipe excess glue off
Take a cloth or paper towel and remove any excess glue before it dries out, to keep your project neat and tidy.
Step 5: Mock up your cart so far

What we’re going to do next is mock up your cart so far. Take your rod and put it through your Ts. Attach a nut on the inside of the wheel. Then, add a washer and a nut on the outside of the wheels.
Step 6: Measure the space between the Ts on the rod
We’re going to use PVC pipe between the wheels to cover up the rod, hold your Ts in place, and make your cart look neat and professional. So grab a tape measure and measure the gap between your two Ts when they’re pushed as far apart on the rod as possible.
Step 7: Cut your PVC piping for the base of the cart

Once you’ve measured the gap between the end caps, you need to cut your PVC piping. You can do this with a hacksaw, but it’s quicker and easier with PVC pipe cutters. You can buy them affordably at most stores, and they are a great addition to any workshop. With pipe cutters, just align them where you want to cut, apply pressure, and you should get a nice, clean cut.
Step 8: Assemble the base of your cart

Now it’s time to put everything together so far. On your rod, thread through the PVC piping section you just cut, and then add a T junction on each side. You’ll only need a plug on the outer side of the T, where it will meet the wheels. Add a nut and a washer, and then the wheel. On the outside of the wheel, add a nut (you don’t need a washer here.)

Now, the base is ready. But if you’re thinking about adding a handle to your cart, don’t glue things in place just yet.
Step 9: Cut your piping to the right lengths
Cut six more 12 inch sections of PVC piping and start putting together your supports for the kayak. You can alter this length a bit depending on how large you want your cart to be and how much piping you have left.
Step 10: Assemble the kayak supports

Slot in two of piping sections into your Ts, and then add another T on top of each. Into these Ts, add another section of piping on each side. This is the basic structure of your cart, and where your kayak will sit when in use.
Step 11: Decide whether you want to add a handle or not

You have two options for the bottom section of your cart. You can leave it as it is, with one section of PVC piping between your end caps. But if you have a few feet of PVC piping left over after making the supports, you can choose to add a handle in. A handle will make it easier to pull your cart and will act as a kickstand when you’re not moving.
Step 12: Make the handle and crossbar (optional)

To build the handle, you’ll need to disassemble your cart and remove the central piece of PVC pipe at the base of the cart. Then, you need to cut this section in half and remove about 2 inches from the center. Reassemble your cart with a T right in the middle of the base piping section. This is where you’ll attach the handle.
You can add a crossbar for extra support if you have enough piping left over. To do this, you’ll need to remove the top support sections and add an extra T right below the top T junction. Measure the space between these Ts on each side, and cut a piece of piping to fit in between.
Step 13: Add pool noodles to your kayak supports
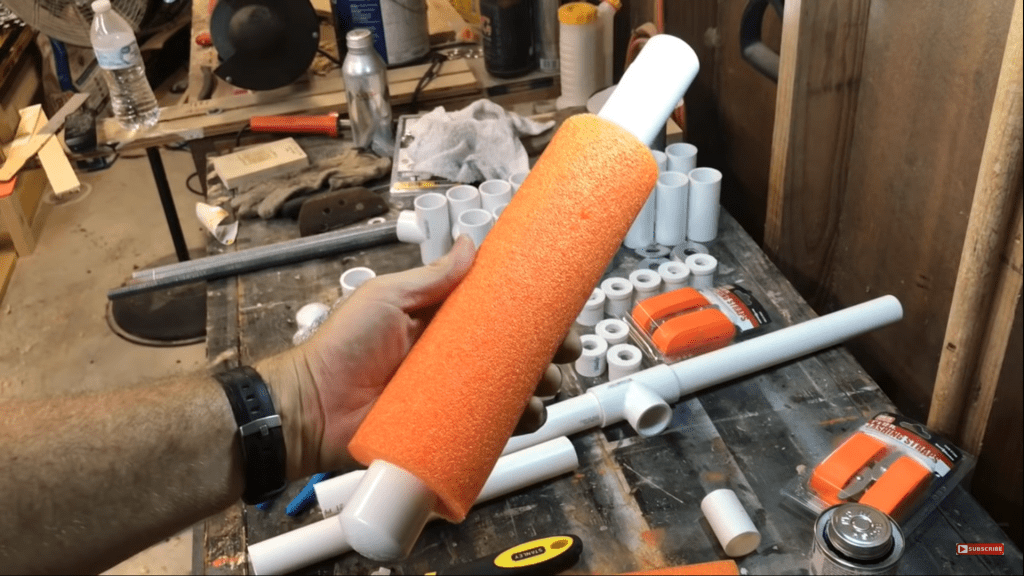
Cut along the length of your pool noodle, open up the slit, and then attach the noodle onto the upper PVC piping sections where the kayak will sit. This will add some cushioning for your kayak. Use 2-3 zip ties to secure the noodle on, so it stays in place. You can find a different method if you prefer!
Step 14: Assemble & glue the cart and add lashing straps
Now you have your final design, so it’s time to assemble it from the wheels up. Glue all your sections together.

The lashing straps will hold your kayak in place when you’re moving it. To attach them, just use a bolt to attach the lashing straps to the arms of the cart. And that’s it – your kayak cart is ready!
FAQs
How much does it cost to build a kayak cart?
The cost of building a kayak cart depends on the materials and tools you use. Generally speaking, you can expect to spend around $50-$100 on materials and tools to build a basic kayak cart.
If you want to use high-quality materials and tools, you can expect to spend upwards of $150-$200.
Are DIY kayaks better?
DIY kayaks can be just as good as store-bought kayaks, if not better. The advantage of building a kayak of your own is that you can customize it to your exact needs and preferences.
You’ll also save money since you won’t have to buy a store-bought kayak. However, it’s important to note that building a kayak from scratch can be a time-consuming and challenging endeavor.
The Wrap Up
So there you have all the steps you’ll need to take to build your very own DIY kayak cart. It’s not as difficult as it sounds. Just follow the instructions, and you’ll have your kayak cart ready in no time!
It will be just as good as any product you can buy in store, while costing you a fraction of the price. Plus, there’s nothing like knowing you made something with your own hands. You’ll be able to transport your kayak safely and easily down to the water. So what are you waiting for? Go grab everything you need and get started!


1 thought on “Inexpensive Way to Build a DIY Kayak Cart”
When using PVC you use the primer to prep the plumbing material for the glue. You should not be recommending using only primer, PVC will not bond without primer AND glue.